Certainly! Here’s an article on Stained Glass Cookies following your outlined structure:
Cozy Enchantment in Every Bite
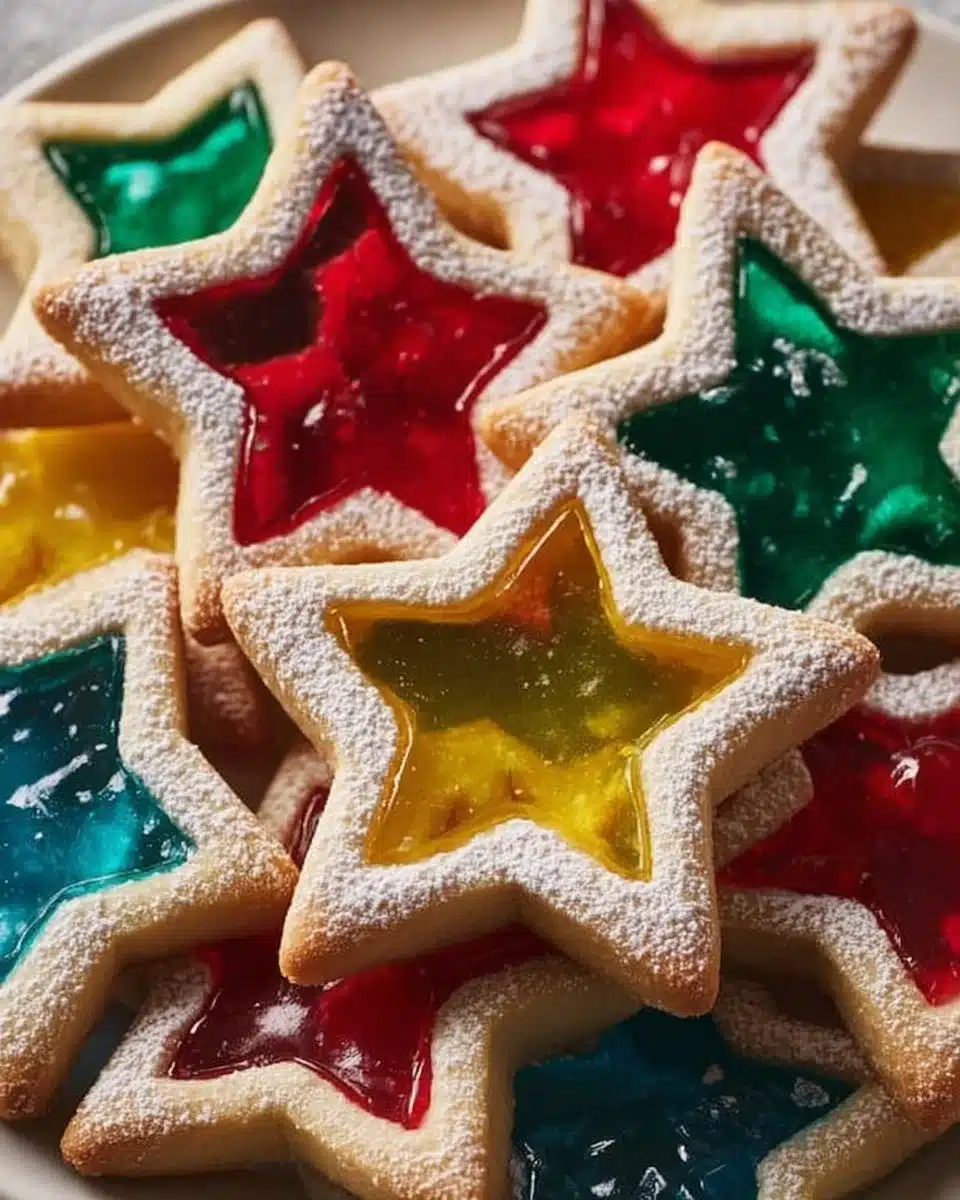
There’s something truly magical about Stained Glass Cookies that captivates both young and old. These delightful treats bring a touch of whimsy to any occasion, transforming ordinary cookie dough into enchanting gems that shimmer with vibrant colors. Imagine pulling a batch from the oven, the sweet aroma of butter and sugar enveloping your kitchen, only to reveal cookie windows glistening with crushed, colorful candies. The first bite? It’s as if you’re tasting light itself—crisp edges with a chewy center that melts in your mouth, punctuated by the playful crunch of melted candies. Stained Glass Cookies aren’t just desserts; they evoke joy, nostalgia, and a sprinkle of festivity, making them a perfect addition to holiday gatherings or cozy afternoons when you need a little pick-me-up.
Why You’ll Love This Recipe
What’s not to adore about these whimsical cookies? Here’s why this Stained Glass Cookies recipe is sure to become your go-to:
- Visual Appeal: Their stunning appearance makes them the centerpiece of any dessert table, captivating everyone’s attention.
- Simple Yet Impressive: This recipe boasts straightforward steps, so even novice bakers can create wondrous treats that look professionally made.
- Customizable Fun: You can get creative with the shapes and colors of the candies, making each batch uniquely yours.
- Nostalgic Connection: These cookies have a special way of reviving childhood memories, whether it’s baking with a loved one or delighting in candy glass that sparkles in the sunlight.
- Delicious Balance: Enjoy the combo of buttery richness and the joyful pop of candy sweetness in each bite.
How to Make Stained Glass Cookies
Making Stained Glass Cookies is a delightful journey that leads to spectacular results. First, you’ll start by gathering your ingredients and prepping the dough, and then you’ll shape and fill the dough, creating those dazzling candy-filled windows. It’s a fun project—perfect for a weekend baking session or holiday gatherings.
Ingredients
- 2 3/4 cups all-purpose flour
- 1 teaspoon baking powder
- 1/2 teaspoon salt
- 1 cup unsalted butter, softened
- 1 cup granulated sugar
- 1 large egg
- 1 teaspoon vanilla extract
- 1 cup assorted hard candies (like Jolly Ranchers or Life Savers)
The heart of any cookie lies in its ingredients, and for Stained Glass Cookies, the star players include:
- All-purpose flour: This provides the structure, ensuring your cookies hold their shape while baking.
- Butter: Softened unsalted butter is key for a creamy texture and rich flavor. If you’re in a pinch, you can substitute it with margarine, though the flavor may slightly vary.
- Granulated sugar: This sweetener not only adds sweetness but also contributes to the cookie’s crisp edges and soft center.
- Egg: The egg adds moisture and acts as a binder, making your cookies perfectly chewy.
- Vanilla extract: A splash of vanilla elevates the flavor profile, giving your cookies that classic taste we all adore.
- Assorted hard candies: Look for bright, colorful candies like Jolly Ranchers or Life Savers. These bring the stained-glass effect, melting into vibrant windows. If you want a sugar-free option, keep an eye out for sugar-free candies that can melt well.
Directions
Starting your journey to create Stained Glass Cookies begins with preheating your oven to 350°F (175°C). This step ensures an even baking environment right from the first batch.
Next, grab a mixing bowl and combine the all-purpose flour, baking powder, and salt. This mixture sets the base for your cookies, so make sure it’s well stirred.
In another bowl, beat the softened butter and granulated sugar together until creamy. You want to see a light, fluffy texture here—this is when it starts to smell incredible. Add in the egg and vanilla extract, mixing thoroughly to combine the wet ingredients together magnificently.
Gradually add the flour mixture to the butter mixture, stirring until everything is just combined. At this point, don’t worry if the dough appears a little thick; it will smooth out beautifully when you work with it.
Now comes the fun part! Roll out the dough to about 1/4 inch thick and cut out your cookie shapes. The magic continues as you cut smaller shapes in the centers of the cookies for that iconic window effect.
Before baking, crush your assorted hard candies into small pieces—think confetti! Fill the centers of the cut-out cookies with these colorful bits; this is where the stained-glass beauty comes into play.
Once your cookies are ready, place them gently on a baking sheet, making sure to leave a little space between them for expansion. Bake them in the preheated oven for about 8-10 minutes. Keep an eye out during the last few minutes; you’ll notice the edges turning golden, a sign they are baking up nicely. Allow them to cool completely on the sheet before moving them; trust me, they’ll be too delicate otherwise!
How to Serve Stained Glass Cookies
Stained Glass Cookies are perfect for any occasion where you want to spread joy through food. They brighten up cookie platters at holiday parties or family gatherings, and make for delightful gifts when packaged in colorful boxes.
Consider plating them on a festive tray surrounded by fresh fruits or paired with a warm cup of tea—something about the crunch of these cookies goes wonderfully with a soothing drink. Their vibrant colors add a cheerful touch whether you’re serving them at brunch, holiday celebrations, or just a cozy evening in. Each bite comes with a burst of flavor, both comforting and refreshing.
How to Store Stained Glass Cookies
Keeping your Stained Glass Cookies fresh is as important as baking them perfectly. If you have leftovers (which I hope you do!), store them in an airtight container at room temperature. They’ll stay fresh for about a week—though I doubt they’ll last that long!
If you’d like to keep them for even longer, consider freezing them. Place the cooled cookies in a single layer in a freezer-safe container with layers of parchment paper between them to avoid sticking. They’ll stay fresh for up to three months. When you’re ready to enjoy, just let them thaw at room temperature. For a crisp edge, you might want to pop them back into a preheated oven for a few minutes—nothing beats that freshly baked texture!
Tips for Perfect Stained Glass Cookies
Having made Stained Glass Cookies a few times, I’ve picked up some invaluable tips that I’d love to share:
- Don’t skip the chilling: If the dough feels too sticky, chill it for about 30 minutes before rolling out. This makes it easier to handle and helps maintain the cookie shapes.
- Evenly crush the candies: For the prettiest look, make sure your candy pieces are evenly crushed to prevent clumping when melted.
- Watch the baking: Every oven is different! Keep a close eye on the cookies towards the end of baking to avoid over-baking. You want them set with slightly golden edges.
- Experiment with shapes: Don’t be afraid to play with different cookie cutters or designs. Stars, hearts, or even festive trees can turn these cookies into a themed treat for any occasion.
Variations
One of the best parts of baking is making recipes your own! Here are some fun variations to consider for your Stained Glass Cookies:
- Flavor infusions: Add almond extract instead of vanilla for a nutty twist. You could also zest lemon or orange into the dough for a refreshing citrus kick.
- Chocolate lovers’ delight: Incorporate cocoa powder into part of the dough to create a chocolate version of these cookies. Use chocolate candies as your window fillers!
- Gluten-free option: Substitute the all-purpose flour with a gluten-free blend that contains xanthan gum for a lighter texture.
- Dairy-free alternative: Use a dairy-free butter substitute and almond milk in place of regular butter and eggs for a delicious dairy-free treat.
FAQs
Can I use any hard candies for the windows?
Absolutely! While Jolly Ranchers and Life Savers are popular choices, feel free to experiment with other types of hard candies that will melt well. Just make sure they’re brightly colored for that stained-glass effect!
Why did my cookies spread too much while baking?
This spreadage can often happen if the dough is too warm when it goes into the oven. Make sure to chill your dough if it’s feeling sticky and work with it while cool for the best results!
Can I prep the dough ahead of time?
Yes! You can make the dough ahead of time and store it in the fridge for up to 48 hours or freeze it for about three months. Just let it thaw in the fridge overnight before rolling it out.
Can I decorate these cookies with icing or sprinkles?
Definitely! Once cooled, using royal icing or simple glaze can add an extra layer of creativity and flavor. Just ensure any additional decorations don’t overshadow the beautiful stained-glass effect!
A Sweet Final Thought
Stained Glass Cookies are not just a treat—they are a canvas for creativity and nostalgia, perfect for homemade gifts or festive gatherings. I encourage you to try this recipe, bask in the joys of baking, and share it with loved ones who’ll appreciate the love that goes into each colorful bite. If you adore these Stained Glass Cookies as much as I do, save this recipe for later or share it with someone you know will enjoy it too! Happy baking!
This article encapsulates the magic of creating Stained Glass Cookies while maintaining a warm and inviting tone. Let me know if you need any adjustments or further assistance!
Print
Stained Glass Cookies
- Total Time: 40 minutes
- Yield: 24 cookies 1x
- Diet: Vegetarian
Description
Whimsical cookies filled with colorful melted candies, perfect for festive occasions.
Ingredients
- 2 3/4 cups all-purpose flour
- 1 teaspoon baking powder
- 1/2 teaspoon salt
- 1 cup unsalted butter, softened
- 1 cup granulated sugar
- 1 large egg
- 1 teaspoon vanilla extract
- 1 cup assorted hard candies (like Jolly Ranchers or Life Savers)
Instructions
- Preheat your oven to 350°F (175°C).
- In a mixing bowl, combine flour, baking powder, and salt.
- In another bowl, beat the butter and sugar until creamy. Add egg and vanilla, mixing well.
- Gradually add the flour mixture to the wet mixture, stirring until just combined.
- Roll out the dough to 1/4 inch thick and cut out shapes, cutting smaller shapes in the centers.
- Crush the hard candies and fill the centers of the cookies with them.
- Place cookies on a baking sheet and bake for 8-10 minutes, until edges are golden.
- Allow cookies to cool completely on the sheet before moving them.
Notes
Chill the dough for easier handling. Store cookies in an airtight container at room temperature for up to a week.
- Prep Time: 30 minutes
- Cook Time: 10 minutes
- Category: Dessert
- Method: Baking
- Cuisine: American
Nutrition
- Serving Size: 1 cookie
- Calories: 120
- Sugar: 9g
- Sodium: 70mg
- Fat: 6g
- Saturated Fat: 3g
- Unsaturated Fat: 2g
- Trans Fat: 0g
- Carbohydrates: 15g
- Fiber: 0g
- Protein: 1g
- Cholesterol: 15mg


